The tags are heavy duty alternative to labels which are prone to damage in industrial environment.Fitted to all legal access points, the unique holder and insert ensure that the latest scaffold status is instantly visible from the scaffold build stage to dismantle.
Our scaffold tags comply with OSHA's regulations and will help warn employees when scaffolding is not safe. It will indicate if scaffolding is being taken down or has been found defective. The tags are available in three durable write-on materials, providing highly visual and eye-catching information.
Safety Warning Tag,Lockout Id Tag,Lockout Tagout Tags,Safety Tag Lockey Safety Products Co., Ltd. , https://www.lotolockey.com
In addition to the CS/C adapter ring, the panoramic network camera also has a rear image adjustment ring. When adjusting, use a screwdriver to loosen the screw on the adjustment ring and turn the adjustment ring. At this time, the CCD target surface will face the mounting base backwards ( The former) exercise (Figure 2) also plays a role in focusing. Under normal circumstances, using a lens with zoom function can also be used to clear the focus without using a post-adjustment ring, and the focus lens requires post-adjustment of the focus ring. 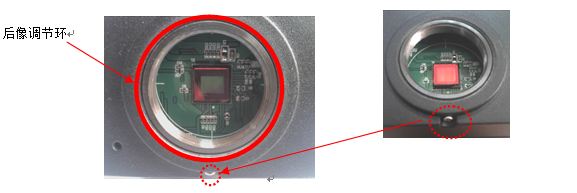
2. When installing the lens to install the lens, first remove the protective cover of the camera and lens (Figure 3, 4), and then gently rotate the lens clockwise into the camera lens connector and put it in place (Figure 5). 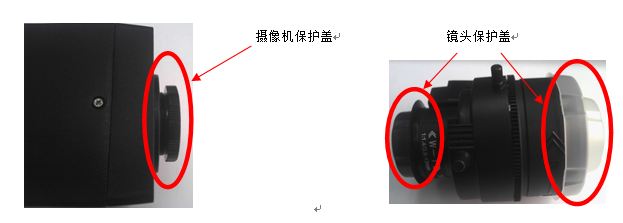
3. Lens adjustment After the lens is mounted, the lens aperture and focal length must be adjusted to obtain the best image quality. The monitoring lens is generally used to adjust the aperture and focal length through the knob. The knob plays two roles. The first one is the adjustment, and the second one is to lock the current position after the adjustment is completed, so as to avoid the position deviation caused by the external force, resulting in loss. Focus phenomenon. When the knob cannot be rotated, avoid using brute force. Make sure that the knob is loose.
Some lens knobs only play a locking role. To rotate the front barrel to adjust the focal length, the user needs to confirm the actual use.
3.1. Adjustment of three variable lenses For the three variable lenses (adjustable focus, zoom, and zoom, see Figure 6), the adjustment procedure is as follows:
1) Adjust the knob 1 to open the aperture to the “O†position so that the lens can get the most light. Lock the knob 1.
2) Adjust knob 3 and pull the lens out to a position parallel to the barrel (be careful not to pull the lens out).
3) Adjust the knob 2 to adjust the zoom and obtain the field of view to capture the scene.
4) Adjust the knob 3 to adjust the focus to get the clearest image. In this step, no matter how the adjustment knob 3 does not make the image clearest, it is necessary to adjust the knob 2 again to adjust the visual field, and then adjust the knob 3 to adjust the focal length.
5) Lock knob 2 and knob 3. 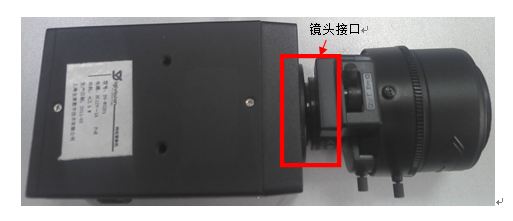
3.2. Adjustment of Two Variable Lenses For two variable lenses (adjustable focus, zoom, and auto iris, see Figure 7), the lens needs to be mounted on the camera before the control cable connector is connected to the camera. On the IRIS interface, the steps to adjust zoom and focus are the same as for the three variable lenses. 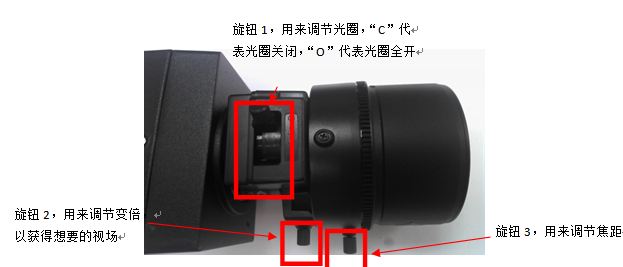


Panoramic Network Camera Lens Installation Guide
1. Determine the lens of the camera lens mounting <br> <br> installation has two kinds of CS and C type, C-type base distance from the reference plane to the focal point of 17.562 mm, CS-type base from the focal length of 12.5 mm , You can use the adapter ring to convert the CS-style base to C-type base (Figure 1). Before installing the lens, make sure that the camera and the lens are the same interface. If not, you need to add or remove the adapter ring according to the specific situation.